Showing posts with label leather. Show all posts

Monday, January 7, 2013

Crafts - iPad mini Sleeve

Just before Christmas a good friend of mine came by the workshop wanting to make a Christmas present for his dad. He wanted to make a protective sleeve for his dad's newly acquired iPad mini. Since I hadn't been doing any sleeves for the mini, I decided to help him out, so I could get a pattern made. This means I didn't do much on this piece besides a little bit of cutting, but I just helped out as much as I could.


Basically we just used a design that I've been doing quite a lot lately. Calling it a design is a bold overstatment. It's not even a design, as it's so ultra simple, but the closing mechanism is great for covers/sleeves, as it doesn't incorporate any hardware, which can scratch the device.


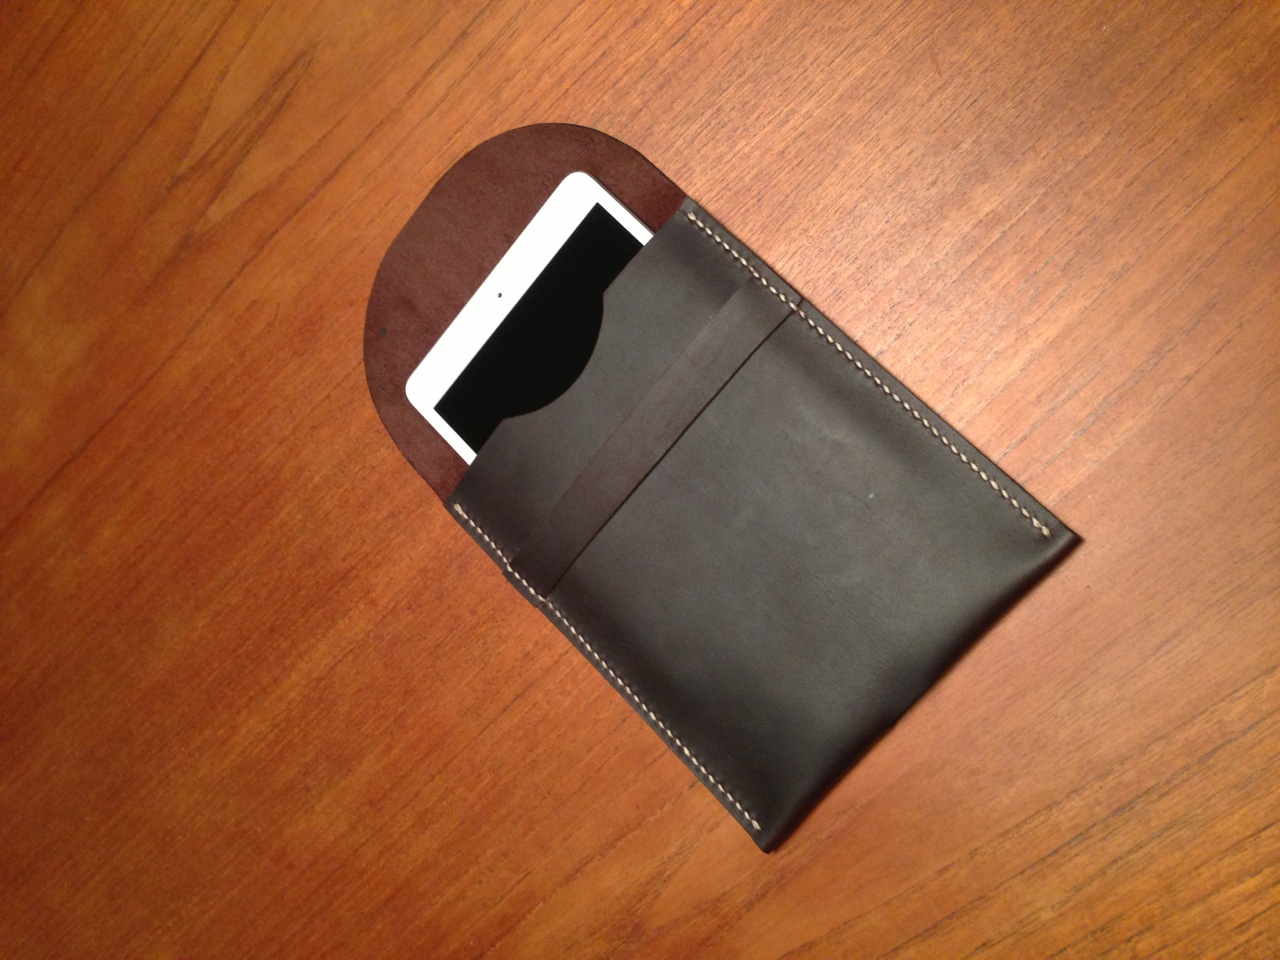
It was made using a leather that is a bit similar to the very famous Chromexcel leather from Horween, as it is a oil pull-up, but not of the very greasy ones. It's very easy to work with and it's very easy to maintain. The leather comes from an Italian tannery.


It's hand sewn using a super thick (8ply) waxed linen thread from Germany that I bought as an early Christmas present for myself.


You can really sense the grain structure in the leather, where it bends. Nice and subtle.


I can't take credit for any of the stitches other than scrutinizing every stitch like a hawk. He did a really good job.


Unfortunately it's virtually impossible to burnish oil tanned leathers. So it's hard doing anything about the edges. You can either leave them raw or you paint the edges using a good edge dye.
READ MORE - Crafts - iPad mini Sleeve

Monday, December 3, 2012

Stephen Kenn Furniture

I just came across this sofa and I feel that I could easily become quite obsessed with it.


It even comes with a great video. However I find a bit too sentimental, so I turned down the volume, but I turned it to full screen, when I saw the warehouse he entered (spoiler allert - Wow...)

READ MORE - Stephen Kenn Furniture

Sunday, December 2, 2012

Brütting Cross-Country Running Shoes

These shoes from Brütting are a perfect combination of old world German craftsmanship and old world technology. They have been in production since the sixties and are to this day still preferred by many athletes. At first glance they don't look like a pair of athletic shoes compared to many of the very technical shoes that we see today, but don't let the looks fool you.

Other than that I've experienced that people either love or hate the looks of these shoes, as the case is with many iconic designs. Personally I fall into the latter category because I like the vintage-feel. But I'm also very biased, as I want all of my clothing to be produced outside of Asia, and these sneakers are made in Germany, so it's hard not to like them.

The solid leather construction incorporates both suede and a greasy/waxy leather, which makes it very easy to maintain. Even the inner sole is made of leather.


The construction of the rubber sole and the tread gives a secure grip on wet and irregular surfaces.


They're made on a rather slim last, which is good for those of you who have narrow feet.
READ MORE - Brütting Cross-Country Running Shoes

Monday, November 19, 2012

Tory Leather - Hoof Pick Belt

It may seem strange, that I make leather goods myself, and still advocate for other makers, but I think it's all about making educated choices, when it comes to purchasing any sort of goods. That means deciding between different options based on your own knowledge and preferences, while taking other people's opinion into consideration.

Tory Leather belts are made in the USA of quite good materials. The leather is bridle leather and the hardware seems solid enough, although I don't think it's a solid brass belt buckle, as my own personal belt lost its golden brass luster and now looks like a nickle/steel buckle. But the belt itself is flawlessly made, albeit you definitely feel that it's not a handmade belt. What I like about it, is definitely the equestrian influence. The buckle is actually a foldable hoof pick (for cleaning the horse's hoof) which is used in a quite clever way. 


But here comes the very best part; It's cheap. It's actually dirt cheap. You can pick it up some places for around $40. So if you're on a budget, this is a good deal for a casual belt.
READ MORE - Tory Leather - Hoof Pick Belt

Wednesday, June 20, 2012

Making a Belt

Working with leather isn't that hard. That is, if you have all the necessary tools and someone with experience to help you along. I sometimes let friends make something simple like a belt, a cardholder or an iPad case, like my friend Rune did. Some days ago I helped my friend, Anders, make a belt for himself, as his old belt was starting to look a bit shabby. We went for a nice, thick, vegetable tanned leather from England and a solid brass buckle (also from England). Sometimes it looks nice when you attach the belt buckle with rivets, but the proper way of doing this is by handsewing, so that is what we did using a thick (6 ply) waxed linen thread.

Someone asked, how you use a stitching clam - I hope this answers the question.


Thick, waxed linen thread is the way to go.


The brass buckles look good, when they're new and/or polished, but they also look amazing, when they tarnish.


Holes for sewing are prepunched using a pricking iron.


The final part of making anything in leather is always the burnishing, which is best done by hand. The burnish is done using a bit of water, some thick canvas and then you just rub it vigorously creating some friction, which keeps the leather fibres down and creates a nice, smooth edge. You then repeat it using beeswax or possibly gum tragacanth. We used beeswax this time.  


Here's the final result


Notice the nice grain structure of this leather. Very pronounced, deep, rustic, defined - I could go on.


I never get tired of brass, which is why, I'm almost exclusively working with brass hardware.


Pretty flawless stitching.


A small detail taken from the equestrian world, where you number each hole to adjust the height.


Lastly - the burnish. A tell-tale sign of true craftsmanship. That being said I do also appreciate a clean cut raw edge.


 I might be making either picture or video tutorial on how to make a belt or something else, if someone would like to see this of course. 
If you would like to see, what gets made in the workshop, I suggest, that you join After the Denim's Facebook group, where I'll regularly put up (terrible) iPhone pictures of, what I'm working on at that given time.
READ MORE - Making a Belt

Sunday, May 20, 2012

Restoration and Modification of An Old Stitching Clam

Some time ago I managed to rescue an old sewing clam, which was being used as display in an suburban clothing store. A sewing clam, you ask, is something you use, when you sew leather by hand. The clam sits between your legs and holds the object for you, so you can use both hands freely for sewing. 
The condition of the clam was rather good, but it still needed a bit of restoration. However the length wasn't ideal for the way I sew leather, as I rarely use an awl for making holes, when I sew. Therefore I needed to modify it slightly by making it shorter, so it would sit in front of me. Therefore I brought it with me to my parent's place, as my dad has more tools and much more experience with woodwork, than I have.

This is how the sewing clam looked before it. It was quite hard for me to alter this old piece of genuine craftsmanship, but I wouldn't be using as much, as I will now. So I felt like, I had to do it in order to bring it back to use and back to life.


First we sanded it down. 


The length was shortened. Nerve wrecking procedure.


Then we drilled some holes in order to add a screw, that would secure the jaws without causing leg fatigue.


I gave it some shellac in order make it a bit harder - although the wood was extremely hard and dry.


After the shellac had dried I glued on some leather at the tip of the jaws. This was added so the object, that you're holding, doesn't get scratched.


Lastly a hinge were attached, so it can still be used the way it was intended.


The final result.


READ MORE - Restoration and Modification of An Old Stitching Clam