Showing posts with label leathercrafts. Show all posts

Sunday, May 20, 2012

Restoration and Modification of An Old Stitching Clam

Some time ago I managed to rescue an old sewing clam, which was being used as display in an suburban clothing store. A sewing clam, you ask, is something you use, when you sew leather by hand. The clam sits between your legs and holds the object for you, so you can use both hands freely for sewing. 
The condition of the clam was rather good, but it still needed a bit of restoration. However the length wasn't ideal for the way I sew leather, as I rarely use an awl for making holes, when I sew. Therefore I needed to modify it slightly by making it shorter, so it would sit in front of me. Therefore I brought it with me to my parent's place, as my dad has more tools and much more experience with woodwork, than I have.

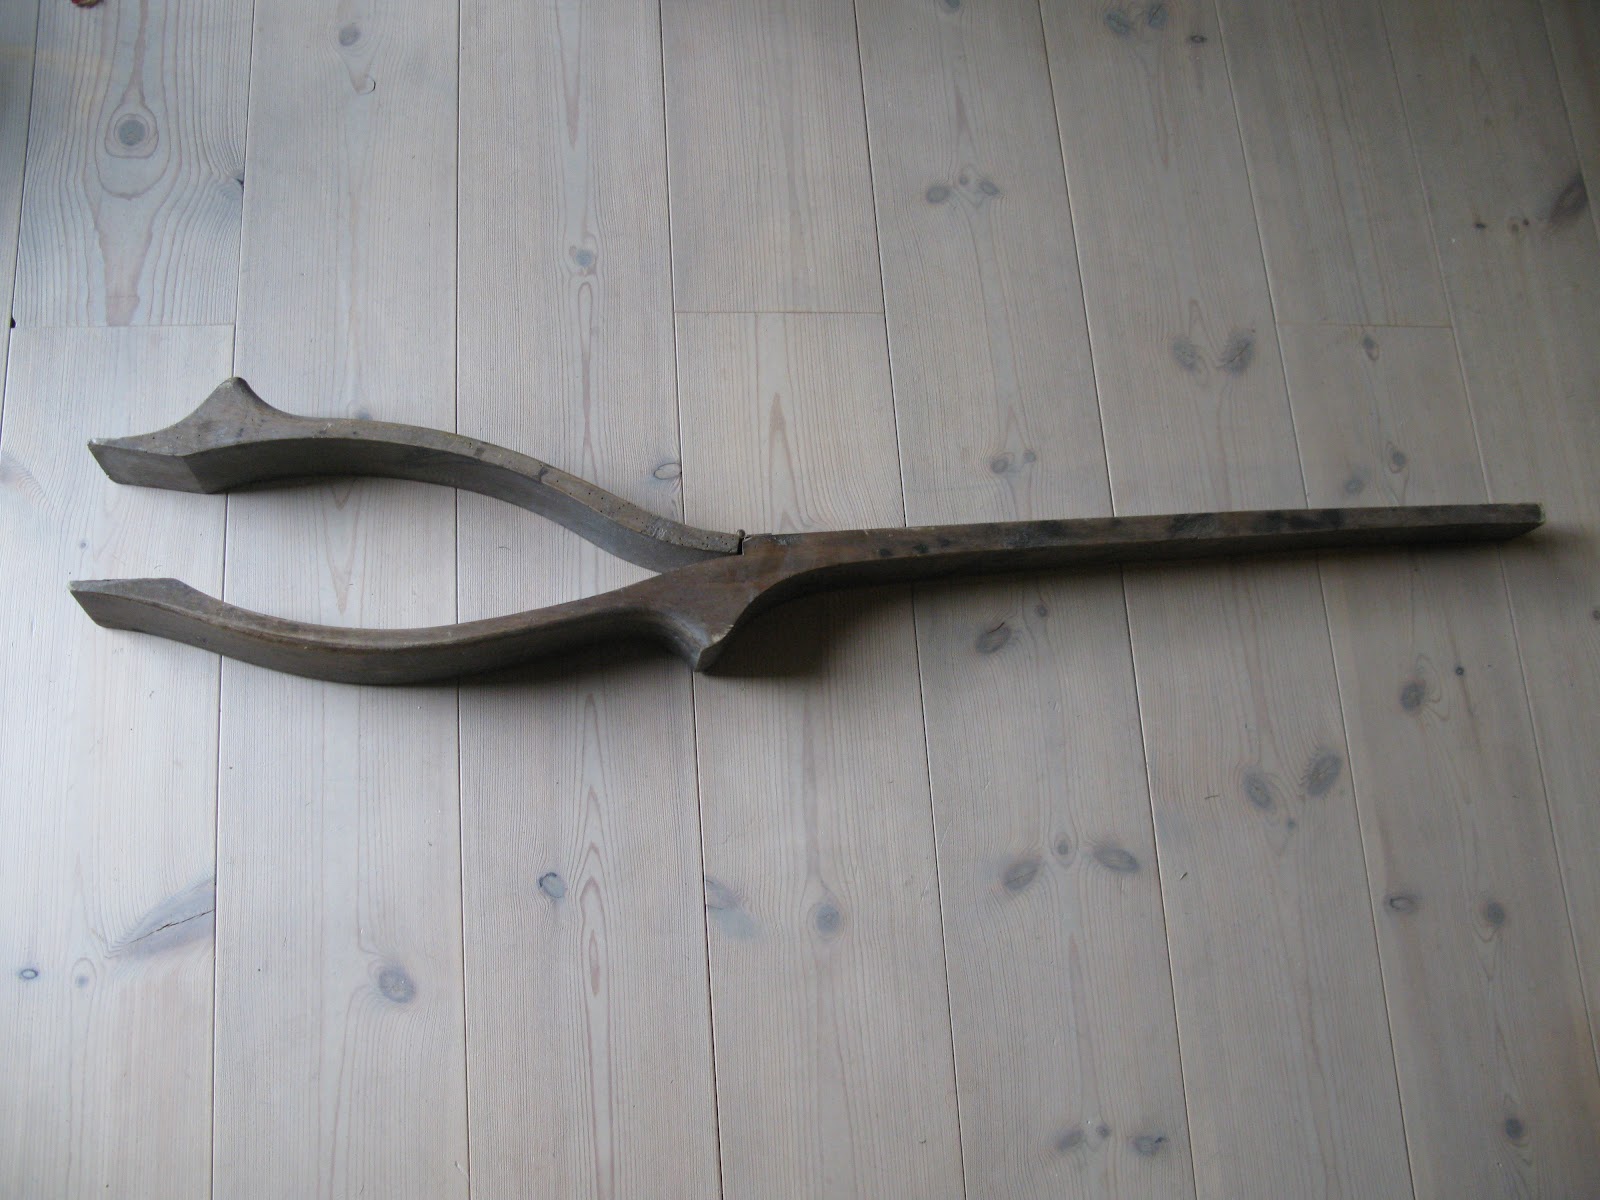
This is how the sewing clam looked before it. It was quite hard for me to alter this old piece of genuine craftsmanship, but I wouldn't be using as much, as I will now. So I felt like, I had to do it in order to bring it back to use and back to life.


First we sanded it down. 


The length was shortened. Nerve wrecking procedure.


Then we drilled some holes in order to add a screw, that would secure the jaws without causing leg fatigue.


I gave it some shellac in order make it a bit harder - although the wood was extremely hard and dry.


After the shellac had dried I glued on some leather at the tip of the jaws. This was added so the object, that you're holding, doesn't get scratched.


Lastly a hinge were attached, so it can still be used the way it was intended.


The final result.


READ MORE - Restoration and Modification of An Old Stitching Clam

Wednesday, November 2, 2011

How to Saddle Stitch Like an Hermès Leather Craftsman

I re-watched this little clip featuring one of the leather craftsmen, that work for Hermès. And I have to say, that I find it very meditative, plus it made me want to do some leather work, which I can't find the time to do at the moment due to obligations at school.


The type of stitching is called saddle stitching and it dates back hundreds of years. It is a very strong stitch, that you use, when hand stitching leather. It is way stronger than a machine made stitch, in case you are wondering.

This diagram will explain it faster, than I'm able to. But if you have any questions regarding leather, leather crafts or want to learn about it, let me know, and I'll try to help.


I hope this will give some of you a better understanding of, why handsewn leather is so much better and why it costs more, as it is quite time consuming, because very few are just as fast as the Hermès craftsman.
READ MORE - How to Saddle Stitch Like an Hermès Leather Craftsman

Thursday, September 22, 2011

Crafts - iPhone 3+4 Case


Lately I haven't quite been up to much in the basement. I have lacked time, energy and inspiration. But yesterday I decided to get down there and get to work! It was a struggle at first, but then I decided to make an iPhone case - another one - for myself and my girlfriend, as we both just bought one.

So yesterday I cut the leather and prepared the leather. Today I spent some time finishing it - although I must say that the edges haven't been burnished yet and the cases haven't been oiled. So consider them somewhat finished, but not quite.

The construction is pretty much the same as the previous one, except these cases were made in a darker vegetable tanned leather (from Italy) and instead of the polyester thread, I used a thinner (5ply) waxed linen thread from Barbour. I would have like to have used a thicker linen thread of 7 or 8 ply, but that's probably just me and I don't have that thickness in this colour at the moment. But besides that change and a couple of other twitches everything was the same, including the wet shaping.

Enjoy - and remember they are also on Flickr.


READ MORE - Crafts - iPhone 3+4 Case

Wednesday, September 14, 2011

Crafts - Key Wallet - Quick Proto


The weather has been horrible today. Overcast and constant showers. I was hoping to spend this day taking some pictures of a new acquisition (in natural light that is) and some other good stuff, but that couldn't be done. So instead I stayed in the basement making a proto type of a key wallet, that I have been meaning to make for my brother-in-law for too long.

I say that this is a proto because I made it very quickly and I didn't have all the right hardware for it. For instance I could have used some smaller snaps and surely also some double capped rivets. And lastly I busted my leather scissor some days ago because I managed to use it on some metal, which is a stupid thing to do. This meant I couldn't round the corners, as well as I'm normally able to do. Anyways, enough with the poor excuses for being a bad leather worker.

For the wallet I used a new, very special leather (from Horween...) with a great story, that I'll tell about some other day and all brass hardware. The inside was treated with Tragacanth and the outside was just brushed over with some Neatsfoot oil, which is also why it seems a bit stained or uneven in the colour. But please go to Flickr and see some higher resolution pics - blogger portrays pictures very poorly.


I sincerely hope that it will get some good use and I sincerely hope that the political party, that my brother-in-law is so involved in, will get a lot of votes at the election this Thursday.

Lastly I would like to thank everybody for the great response that the laundry bag got. I will definitely be making more. Tomorrow I'll be going to Copenhagen to visit friends and family, but I'll still be blogging, albeit not as much.
READ MORE - Crafts - Key Wallet - Quick Proto

Wednesday, August 17, 2011

A Broken Bag

Mathias Kokholm, is a young and very interesting editor and publisher. He is a bookworm and he carries a ton of books in his leather messenger bag from Works Unltd. This has resulted in a bunch of busted seams, broken rivets and a bag that would have been ready for the garbage bin, if he hadn't returned to the shop to have it fixed. The job later got passed on to me, and I did it as a favour.


This is a small pictorial of what I had to do in order to fix the bag. Actually, I didn't fix the bag, so to speak. I improved it basically because a hand stitch (saddle stitch) is way stronger and longer lasting that a machine stitch (lock stitch). I'll find an illustration at some point to show this. I did a lot of hand sewing on the bag, and I just used the same hole that were already present from the machine stitching, which wasn't all straight.
Then I hand punched a solid brass rivet and made a leather washer as backing, to exchange the jiffy rivets that had fallen off. And finally I gave it some - you guessed it - pure Neatsfoot oil, as it looked a bit neglected.
None of the repairs were done to make it look like it when it was new. No, the repairs were indeed made to make it last even longer.


Had I known, how time consuming this was, I would probably have thought twice about accepting the gig, but every stitch made is a learning experience for me. On top of this, Mathias is a great guy, and I like the idea of him carrying around too many books in his bag.


BEFORE


AFTER


READ MORE - A Broken Bag

Tuesday, August 16, 2011

Crafts - Leather iPhone 4 Case


Today was spent in the basement workshop with a good friend and long time supporter of my crafts, Anna.


Anna wanted something to protect her newly acquired and much loved iPhone 4. So I helped her make a case for it in some 3-4 mm (6-8 in total!!) thick vegetable tanned leather.
In the past I have made wallets, card cases, billfolds and different cases but never a case for an iPhone, so I spent some time yesterday drawing some sketches for a possible design. But it was still tricky making the pattern just right for it. But for a prototype I think we nailed it pretty much. I think, it will be a bit easier the next time around - at least I hope that is the case. So if anybody wants one, let me know (at info.afterthedenim@gmail.com), and we can sort out a price.


The process was pretty straightforward, but it always involves a lot of steps. First you cut the leather, then you soak it in water to make it easier to work with. After that there is some more cutting, some more preparation, and some hand sewing. Finally you burnish it, and you burnish it hard and you burnish it good.
Finally you give it some conditioner, in this case pure neatsfoot oil, which always darkens the leather slightly. I decided to use neatsfoot oil because this case will probably be put under hard use and abuse.


* Disclaimer. I didn't do the sewing - I just assisted - my sewing is usually just slightly more straight and clean. But Anna still managed to do a pretty awesome job. Bravo.


** Second disclaimer. Pictures were taken with her iPhone in artificial lighting, while it was pitch black outside. So remember, it looks way better in real life.


*** Third disclaimer. This iPhone case is pretty damn good, so actually it doesn't need any disclaimers. Sorry.
READ MORE - Crafts - Leather iPhone 4 Case